Stock change
Use this transaction to perform the following actions:
-
Move stock from a stock line. It can be an internal location change and/or a stock status change and/or a unit change and/or an identifier change.
-
Generate stock movements and create a stock change document in Sage X3.
Prerequisites
In Sage X3, perform the following actions:
Functional prerequisites
-
Assignment (GESTCA)
Open: Setup > General parameters > Sequence number definition > Assignment
Check that a sequence number is defined and assigned to the Stock changes document.
-
Product (GESITM)
Open: Common data > Products > Products
Use this function to enter the product GTIN (Global Trade Item Number). This information is part of the GS1 composite barcode which can be used to identify the product. The GS1 composite barcode can also be used to identify other key information called Application Identifiers (AIs). In the Stock change transaction, when you scan a GS1 composite barcode, the following AIs are read and entered automatically: the GTIN, the Lot, and the Serial number. Other AIs can be part of the GS1 composite barcode but they are not managed in this transaction.
Note - informationTo be used in this transaction, the GS1 composite barcode needs to include at least the 2 following AIs:- The GTIN. It is used to apply controls on the product.
- At least another AI, not necessarily managed in this transaction.
-
Mobile Automation setup (FUNADCSEARCH)
Open: Setup > Stock > Mobile Automation setup
-
Go to the Stock search section.
-
Select the Stock change flow type.
-
Define the stock search filters that you want to use in this transaction. You can define up to 8 filters.
Note - informationIn this transaction, these filters do not display in the order in which you have defined them in the Mobile Automation setup function. They always display in the following order: Location, Lot, Sublot, Serial number (when the management mode is Received/Issued), Status, Packing unit, PAC/STK conversion factor, Identifier 1 and Identifier 2, Custom field 1 and Custom field 2. -
Functional prerequisites for creating custom composite codes
-
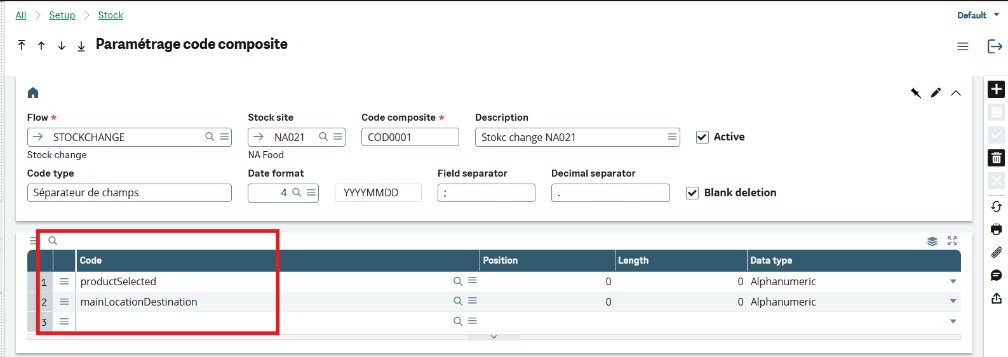
Composite code setup (GESCMPH)
Open: Setup > Stock > Composite code setup
In this function, you can create custom composite codes. Custom composite codes can be read in the Mobile Automation application.
When you read a custom composite code in Mobile Automation, the fields you selected in the composite code setup page will be automatically populated.
For instance, you created a custom composite code in X3 and selected the Product and the Destination location fields:
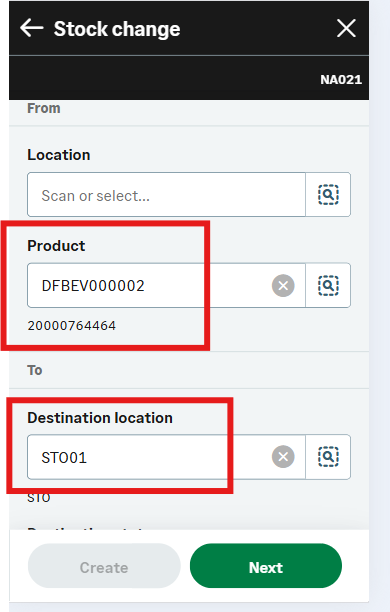
In the Stock change transaction, when you scan the composite code, the corresponding fields will be automatically populated with the values from the barcode:
How to create a stock change
Open: Stock control > Stock change
To create a stock change, you must enter information on the Stock change page:
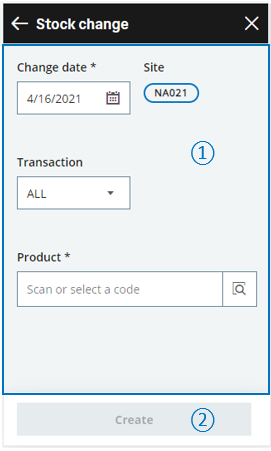
- The first part of the page is used to:
- Set the Change date and the entry Transaction.
- Identify the Product code.
-
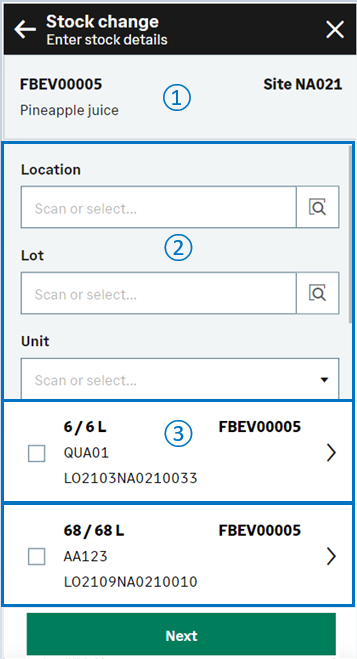
The second part of the page is used to select the product stock lines.
-
The third part of the page is used to enter the quantity to move, the destination location and the other stock destination information.
When you have completed the changes for this product, you can create the stock changes document, or select another product to perform another stock change which will be on the same stock change document.
Operating mode
- In the initial page, check that the Change date, Site and Transaction default values are correct.
- Scan, select or enter the Product code or UPC code. For more information, refer to the Stock change - Enter stock details page section. The Enter stock details page automatically displays the list of the existing stock lines for the product.
- You can filter the list based on the selection filters displayed in the header. These filters are defined in the Mobile Automation setup function (FUNADCSEARCH). Refer to the functional prerequisites.
When you scan a GS1 composite barcode on the initial page, the following detailed information is extracted from the code and entered automatically : The Lot and the Serial number. For more information, see the functional prerequisites. - To access the stock line details, tap the line.
- Enter the quantity and the destination information. Tap Select.
-
The previous Enter stock details page displays again. The checkbox for the stock line to move is automatically selected for the requested quantity.
-
You can select another stock line to perform another stock change which will be in the same stock change document.
-
Tap Next when you have completed all the stock changes for this product.
-
You can perform another stock change for another product: Scan or select another product and repeat step 2 to step 8.
-
Tap Create when you have completed the changes for all the products, and you are ready to validate the stock change creation.
-
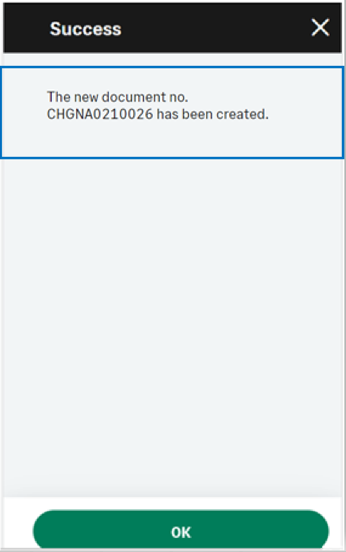
If you could proceed with the creation, the generated stock change number displays. The stock change document and its movements are created.
-
If you could not proceed with the creation, an error or information message displays.
-
Tap Go back to display the previous page.
-
Tap Cancel to delete all the stock changes.
-
-
Step by step
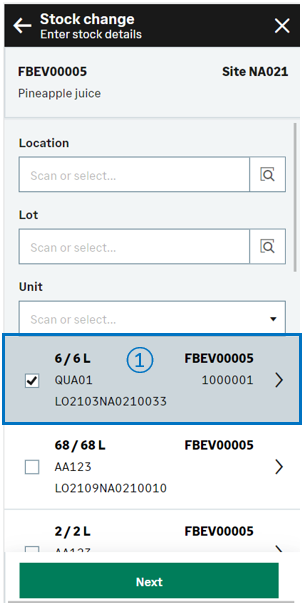
Stock change - Enter stock details page
 |
|
 |
|
||||||||||||||

|
The stock lines are filtered automatically based on the information populated in the previous page. Select a stock line to open and edit the stock line details page. |
Stock change - Stock line details page
The page displays the stock details. You can enter the quantity to move and select the destination information.
 |
|
Depending on how the product is managed, you might need to select the related stock details.
For example, if the product is managed by global serial number, you need to select the range of serial numbers to be moved, before selecting the other destination information.
Create the stock change document and generate stock movements

|
||
|
Tap Create when you have completed all the product changes and you are ready to validate the stock change creation and print the stock labels. Note - settingsTo print labels, refer to the functional prerequisites.
|
||
|
|
||
|
Note - informationTo access a Stock change transaction, CWSSCS function must be authorized.
To create a Stock change, GESSCS function must be authorized. |
|||
| Field | Description | Sage X3 field code | Table (data creation) |
|---|---|---|---|
| Site | Receipt site | STOFCY | SCHGH |
| Change date | Effective date | IPTDAT | SCHGH |
| Product | Product code | ITMREF | SCHGD |
| License plate number | LPN | LPNNUM | SCHGD |
| Location | Location | LOC | SCHGD |
| Destination location | Location of destination | LOCDES | STOJOU |
| Lot | Lot number | LOT | SCHGD |
| Sub-lot | Sub-lot number | SLO | SCHGD |
| Status | Status | STA | SCHGD |
| Destination status | Status of destination | STADES | SCHGD |
| Quantity to move | Quantity in packing unit | QTYPCU | SCHGD |
| Quantity to move | Quantity in stock unit destination | QTYSTUDES | SCHGD |
| Unit | Packing unit | PCU | SCHGD |
| Destination unit | Packing unit of destination | PCUDE | SCHGD |
| Conversion factor | Packing unit to stock unit conversion factor | QTYPCUSTUCOE | SCHGD |
| Destination conversion factor | Packing unit to stock unit conversion factor of destination | COEDES | SCHGD |
| Serial number | Starting serial number | SERNUM | SCHGD |
| Identifier 1 | Free field 1 | PALNUM | SCHGD |
| Destination identifier 1 | Free field 1 of destination | PALNUMDES | STOJOU |
| Identifier 2 | Free field 2 | CTRNUM | SCHGD |
| Destination identifier 2 | Free field 2 of destination | CTRNUMDES | STOJOU |
| Custom field 1 | User area 1 | STOFLD1 | SCHGD |
| Custom field 2 | User area 2 | STOFLD2 | SCHGD |
Limitations
-
You cannot enter a quality request number.
- You cannot scan a composite code on the sidebar.
- Fields on the sidebar do not read and interpret the composite code.